
Magic Lens Photo Media · Real Estate Media
A room can look comfortable in person while the camera records a bright window and a much darker interior. HDR is one way to work with that contrast. It becomes a problem when the processing is more noticeable than the room.
For a listing agent, the useful standard is whether the finished image is clear, consistent and believable. The word HDR alone does not establish any of those qualities.
What HDR means in this context
Exposure bracketing means making photographs of the same scene at different exposure levels. Those frames can be combined to retain useful information across brighter and darker areas. Adobe’s HDR photo-merge documentation describes that workflow in Lightroom Classic.
The technique is distinct from image resolution. A file can contain many pixels and still have poor composition or unnatural color. HDR also does not mean that every shadow should disappear or every window should look equally dark.
When the technique can be useful
An interior with a bright exterior view is a familiar example. A brighter exposure may hold the room’s detail while a darker exposure records information in the window. Combining usable source material can help the finished photograph show both areas.
The choice still depends on the scene. The photographer may use different capture and lighting methods to get a natural result. Ask what visual problem needs solving rather than requiring a particular technique for every frame.
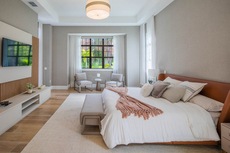
The Windsor Cay bedroom photograph below is a finished portfolio image used to discuss visible qualities: readable surfaces, window light and material color. It is not presented as an HDR before-and-after or proof of a particular capture method.

Five signs that processing is competing with the home
- Bright or dark halos: Inspect edges around windows, rooflines and furniture where an outline can draw attention away from the scene.
- Flat surfaces: If all local contrast is removed, cabinets and walls can lose the shading that explains their shape.
- Exaggerated color: Strong saturation can make floors, paint and lawns appear unlike their actual appearance.
- Inconsistent windows: An exterior view should belong to that room and feel coherent with the interior light.
- Color changes across the gallery: The same wall should not appear markedly different from one adjacent angle to the next without a real lighting reason.
These are review prompts, not a diagnosis of any specific photograph. Look at the whole room first, then inspect the areas that seem distracting.
What HDR cannot fix
Bracketing does not solve a camera position that hides the room’s main feature. It does not clear counters, straighten furniture or decide which space deserves the first place in a gallery. A strongly stretched foreground chair remains a composition problem even when the exposure is balanced.
Good preparation and an intentional camera position therefore come first. Use the photo-day preparation checklist before asking editing to rescue a room that was not ready.
A useful review routine for the delivered gallery
- Open the images at a normal viewing size and check whether each room is easy to understand.
- Compare adjacent views for changes in brightness and material color.
- Inspect window frames, edges and reflective surfaces when something looks unnatural.
- Compare the photographs with your knowledge of the property’s actual condition.
- Describe any correction by image and visible issue: “the wall looks unusually yellow in image 12,” for example.
Specific feedback is easier to act on than “make everything pop.” It also avoids pushing an entire gallery toward stronger contrast or saturation when only one area needs attention.
Exposure correction and property alteration are different decisions
Balancing an exposure does not justify inventing a view, removing a permanent structure or concealing property damage. Keep a separate conversation for staging, compositing and any change to the depicted contents or condition. The Magic Lens editing and virtual-staging standards explain that boundary.
For a broader review of exposure, color and perspective, see the real estate photo-editing guide.
Discuss the result you need
Send the listing address, the room that is difficult to photograph and the intended use of the images. Discuss natural-looking listing photography or review listing media packages. The aim is a coherent gallery that presents the property accurately.
Give your next shoot a clear brief.
Send the property link, three priorities and the places where the media will appear.